A good jack-o’-lantern doesn’t need an art degree or a drawer full of special tools. Most of the designs that look best on a dark porch are built from a few bold shapes: circles, triangles, crescents and simple curves. That is good news if you are carving for the first time, or if you want something cute and polished without spending the whole evening on it.
These 15 easy pumpkin carving ideas for Halloween 2026 start with the classics and move toward designs that take a little more patience. Each one lists the difficulty, a realistic carving time, the tools you’ll need and step-by-step instructions. Halloween falls on a Saturday this year, so there is time to carve on Friday evening and light up for the whole weekend.
Before you start: the basic method
Every design below uses the same preparation, so it’s worth doing it well.
- Cut the opening. Draw a circle about 5 to 6 inches wide around the stem, or on the back or bottom of the pumpkin. Angle the saw slightly toward the center so the lid rests on a ledge instead of falling in.
- Scoop it out. Remove the seeds and stringy pulp, then scrape the wall you plan to carve until it is about 1 inch thick. Thinner walls are easier to cut and let more light through.
- Draw the design. Sketch it on the outside with a washable marker, or tape a printed template in place and trace over the lines with a poking tool.
- Carve from the center outward. Cut the small, detailed shapes first while the pumpkin is still strong, then the larger openings.
- Push pieces out from the inside. Pressing gently from inside the pumpkin keeps the edges clean.
15 easy pumpkin carving ideas
1. Classic smiling jack-o’-lantern
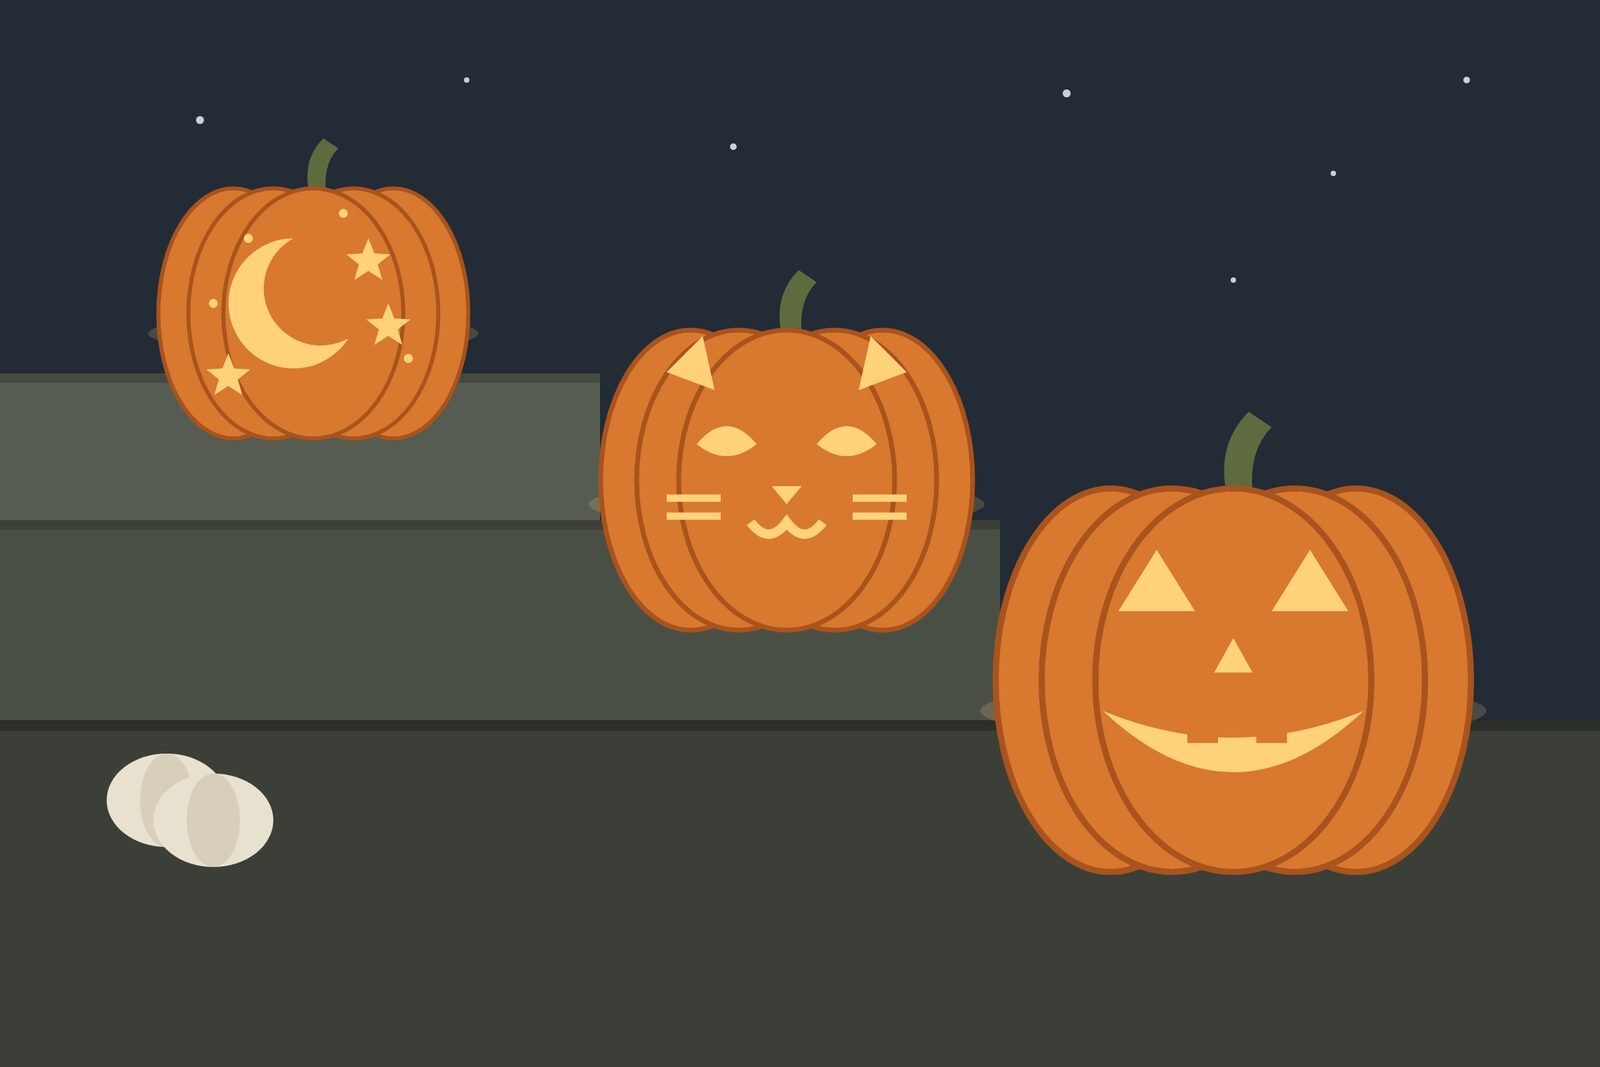
The traditional face, with two triangle eyes, a triangle nose and a wide grin, is still the easiest design to read from across the street.
Difficulty: Easy. Time: 20–30 minutes. Tools: carving saw, scoop, washable marker.
- Draw two triangle eyes about a third of the way down from the top.
- Add a smaller triangle nose centered below them.
- Draw a wide crescent mouth with two or three square teeth along the top edge.
- Cut the eyes and nose first, then the mouth, leaving the teeth in place.
Tip: Keep each tooth at least 1 inch wide so it doesn’t snap off.
Display: It looks best at eye level on a porch step, lit with a warm-white LED.
2. Cute wide-eyed pumpkin
Big round eyes with small uncut “highlights” give this design an innocent, cartoon-like look that works well for younger visitors.
Difficulty: Easy. Time: 25–35 minutes. Tools: carving saw, scoop, marker, a small poking or drill tool from a carving kit.
- Draw two large circles close together, about 2 to 3 inches wide.
- Inside each circle, mark a small circle near the top that you will not cut. This becomes the shine in the eye.
- Add a tiny “u” shaped smile and two small dots for cheeks.
- Cut around the outside of each eye, working carefully around the small highlight so it stays attached at one edge.
Tip: Leave the highlight joined to the rim of the eye by a small bridge of pumpkin, or it will fall out.
Display: Pair it with a few uncarved mini pumpkins for a cute Halloween pumpkin idea that suits a front window.
3. Friendly cat-face pumpkin
Two pointed ears cut from the top edge turn a round pumpkin into a cat with very little extra work.
Difficulty: Beginner-friendly. Time: 30–40 minutes. Tools: carving saw, scoop, marker.
- Cut the opening in the back instead of the top, so the top edge stays whole.
- Draw two triangle ears where the top of the pumpkin curves down, then cut them out as openings.
- Add almond-shaped eyes and a small upside-down triangle nose.
- Draw a “w” shaped mouth and three short whisker slits on each side.
Tip: Cut whiskers as narrow slots rather than thin lines; thin lines tend to crack.
Display: Place it on a windowsill so the cat appears to be looking out.
4. Simple star pattern
Scattered stars of different sizes make a pretty design that glows without a face at all.
Difficulty: Easy. Time: 20–30 minutes. Tools: carving saw, scoop, marker, or small metal star-shaped cookie cutters.
- Mark five to nine stars across the front, mixing large and small.
- Leave at least 1 inch between stars so the wall stays strong.
- Cut each star, starting with the smallest.
- If you use a cookie cutter, tap it in gently with a rubber mallet, then push the piece out from inside.
Tip: Five-point stars are easier to cut neatly if you work one point at a time, always cutting toward the center.
Display: A cluster of starry pumpkins on a table makes a soft light pattern on nearby walls.
5. Crescent moon and stars
One large crescent with a few small stars gives a calm, night-sky look that suits both Halloween and the weeks after.
Difficulty: Easy. Time: 25–35 minutes. Tools: carving saw, scoop, marker, poking tool.
- Draw a circle on the front, then draw a second, overlapping circle to create a crescent.
- Add three to five small stars around it.
- Poke a few single holes for tiny distant stars.
- Cut the crescent first, then the stars.
Tip: Poked holes look best when they are slightly angled, which scatters the light.
Display: Use a cool-white LED for a moonlit effect.
6. Funny goofy face
Uneven eyes, a lopsided grin and one tooth turn a basic face into something that makes people laugh.
Difficulty: Easy. Time: 25–30 minutes. Tools: carving saw, scoop, marker.
- Draw one big round eye and one small, squinting eye.
- Add a round nose slightly off-center.
- Draw a wide, tilted smile with a single square tooth.
- Optionally, add a tongue shape below the mouth that you leave uncut.
Tip: Draw the face a few times on paper first. Funny faces depend on exaggeration, so push the uneven proportions.
Display: Funny pumpkin carving ideas work well near the front door, where visitors see them up close.
7. Minimalist geometric pumpkin
Clean lines of triangles or diamonds give a modern look that fits contemporary porches.
Difficulty: Beginner-friendly. Time: 35–45 minutes. Tools: carving saw, scoop, marker, painter’s tape, flexible ruler or tape measure.
- Use painter’s tape to mark two horizontal guide lines around the pumpkin.
- Between the lines, draw a row of matching triangles, alternating point up and point down.
- Cut every other triangle so the band stays strong.
- Remove the tape and wipe away marker lines.
Tip: Cutting alternate shapes keeps enough pumpkin between openings to support the design.
Display: Group it with uncarved white or green pumpkins for a simple pumpkin carving idea with a modern feel.
8. Spooky slanted-eye pumpkin
Angled triangle eyes and a jagged mouth make the classic face look sinister instead of friendly.
Difficulty: Easy. Time: 25–35 minutes. Tools: carving saw, scoop, marker.
- Draw two triangle eyes with their inner points angled down toward the nose.
- Add a narrow, pointed nose.
- Draw a wide mouth with sharp zigzag teeth along both edges.
- Cut carefully around each tooth point.
Tip: Make the zigzags wide and shallow rather than tall and thin, so they don’t break.
Display: Light it with an orange or flickering LED and place it lower down, where it seems to look up at visitors.
9. Grinning monster
Uneven eyes, a single fang and a few stitches create a friendly monster that works for all ages.
Difficulty: Beginner-friendly. Time: 35–45 minutes. Tools: carving saw, scoop, marker, poking tool.
- Draw one large eye and one smaller one, at slightly different heights.
- Draw a wide grin with one long fang hanging from the top lip.
- Add a short scar across one cheek.
- Poke small holes along both sides of the scar to look like stitches.
Tip: A “stitch” made of poked holes is easier and stronger than carving tiny rectangles.
Display: Monster pumpkins look good grouped with other faces as a “family.”
10. Heart-eyed pumpkin
Heart-shaped eyes and a small smile turn a jack-o’-lantern sweet rather than scary.
Difficulty: Easy. Time: 25–35 minutes. Tools: carving saw, scoop, marker, or small metal heart cookie cutters.
- Draw two hearts of the same size, side by side.
- Add a small curved smile and two tiny dots for cheeks.
- Cut the hearts slowly, following the curve rather than forcing the saw around the point.
Tip: Cut each side of a heart from the bottom point upward, meeting in the middle at the top.
Display: Pink or warm-white LEDs suit this design, especially on a front window.
11. Silly toothy grin
This face is all mouth: a huge grin full of uneven, blocky teeth.
Difficulty: Beginner-friendly. Time: 35–45 minutes. Tools: carving saw, scoop, marker.
- Draw a mouth that covers most of the lower half of the pumpkin.
- Draw large square teeth of different sizes along the top and bottom edges.
- Add small round eyes placed high and close together.
- Cut the mouth outline carefully around each tooth.
Tip: The bigger the mouth, the weaker the pumpkin. Choose a large, firm pumpkin with a thick wall for this one.
Display: Place it where children walk past; the oversized grin reads well from a distance.
12. Matching mini-pumpkin set
Instead of one big design, carve three to five small pumpkins with simple matching details, such as one shape each.
Difficulty: Easy. Time: 10–15 minutes per mini pumpkin. Tools: small saw from a carving kit, small spoon, marker, poking tool.
- Pick small pumpkins with flat bottoms that sit steadily.
- Cut a small opening in the back of each.
- Give each one a single symbol: a star, a moon, a heart and a small face.
- Light each with a small battery tea light.
Tip: Mini pumpkins have thin walls, so use light pressure and short saw strokes.
Display: Line them up along porch steps or a mantel for a set that looks planned.
13. Bat silhouette
A cut-out bat in flight is one of the most recognizable easy Halloween pumpkin designs.
Difficulty: Beginner-friendly. Time: 30–40 minutes. Tools: carving saw, scoop, marker or printed template, tape, poking tool.
- Draw or tape a simple bat outline in the center: a small body with two wings that curve into three points each.
- Trace over the template with a poking tool, then remove the paper.
- Cut the body first, then each wing, working out toward the tips.
- Add a few small poked holes around it as stars.
Tip: Keep the wing points rounded slightly rather than needle sharp, so they stay intact.
Display: Put it in front of a pale wall, where the bat shape projects as a shadow.
14. Autumn leaf design
A single large leaf, such as a maple or oak leaf, makes a natural design that can stay out after Halloween.
Difficulty: Beginner-friendly. Time: 35–45 minutes. Tools: carving saw, scoop, marker, poking tool.
- Draw one large leaf shape on the front, or press a real leaf against the pumpkin and trace around it.
- Mark the central vein and a few side veins.
- Cut the leaf outline but leave the veins as uncut strips.
- Poke small holes along the edge if you want a lacy look.
Tip: Leaving the veins uncut gives the leaf structure and keeps the pumpkin wall strong.
Display: Surround it with fall leaves, small gourds or a wool throw for a cozy porch.
15. Layered face (a step up)
This design uses three levels: holes cut right through, areas where only the skin is scraped away, and untouched skin. The scraped areas glow softly while the cut areas shine brightly.
Difficulty: Moderate. Time: 60–90 minutes. Tools: carving saw, scoop, marker, a scraping or loop tool, poking tool.
- Draw a simple face with large eyes and a wide smile.
- Cut the pupils and the inside of the mouth all the way through.
- Use a scraping tool to remove only the orange skin around the eyes and mouth, about 1/8 inch deep.
- Hold a light inside to check the glow, and scrape a little deeper where you want it brighter.
Tip: Scrape gently and check often. If you go through the wall, turn that spot into another cut-out.
Display: Shaded designs look best close up, so place this one on a table or near the door.
Quick comparison
| Design | Difficulty | Time | Best for |
|---|---|---|---|
| Classic smiling jack-o’-lantern | Easy | 20–30 min | First-time carvers |
| Cute wide-eyed pumpkin | Easy | 25–35 min | Young kids |
| Friendly cat face | Beginner-friendly | 30–40 min | Windowsills |
| Simple star pattern | Easy | 20–30 min | Tables and shelves |
| Crescent moon and stars | Easy | 25–35 min | Calm, all-season look |
| Funny goofy face | Easy | 25–30 min | Front doors |
| Minimalist geometric | Beginner-friendly | 35–45 min | Modern porches |
| Spooky slanted eyes | Easy | 25–35 min | Scary displays |
| Grinning monster | Beginner-friendly | 35–45 min | Family groups |
| Heart-eyed pumpkin | Easy | 25–35 min | Cute displays |
| Silly toothy grin | Beginner-friendly | 35–45 min | Large pumpkins |
| Matching mini set | Easy | 10–15 min each | Steps and mantels |
| Bat silhouette | Beginner-friendly | 30–40 min | Shadow effects |
| Autumn leaf | Beginner-friendly | 35–45 min | Displays that last into November |
| Layered face | Moderate | 60–90 min | Readers ready for a challenge |
How to choose the right pumpkin
The right pumpkin makes carving easier and helps your design last.
- Check the stem. University of Illinois Extension suggests choosing a pumpkin with a stem at least 1 to 2 inches long. Never carry a pumpkin by its stem.
- Test the skin. Press your thumbnail lightly into it. If it scratches or dents easily, choose another.
- Avoid damage. Skip pumpkins with holes, cuts or soft spots, which will decay.
- Look for a flat bottom so the pumpkin stands upright without rocking.
- Match the size to the design. Large, smooth pumpkins suit wide faces and the toothy grin; small and mini pumpkins suit single shapes.
- Think about color. The same extension advice notes that lighter pumpkins are easier to carve but do not keep as well.
Essential pumpkin carving tools
You don’t need much, but the right tools make cleaner cuts and are safer than improvising.
- A pumpkin carving kit. Most kits include small serrated saws, a scoop and a poking tool. The saws are short and narrow, which makes them easier to control than kitchen knives.
- A washable marker for drawing your design. Mistakes wipe off with a damp cloth.
- A sturdy scoop or large metal spoon for removing seeds and thinning the wall.
- A small serrated carving saw for detail work such as teeth, whiskers and star points.
- Battery-operated LED lights for display. They don’t heat the pumpkin and don’t create a fire risk.
- Optional extras: painter’s tape, printed templates, small metal cookie cutters and a scraping tool for shaded designs.
Use tools made for pumpkin carving or crafts, and avoid substitutes such as power tools or large chef’s knives.
Pumpkin carving safety tips
Pumpkin skin is tougher than it looks, and most carving accidents happen when a tool slips.
- Work on a stable, dry surface, such as a table covered with newspaper. Wipe up pulp so the pumpkin doesn’t slide.
- Keep your hands clear of the cutting path. Hold the pumpkin with one hand well away from where the saw is moving.
- Use short, gentle sawing strokes rather than forcing a blade through.
- Let adults handle the sharp tools. The American Academy of Pediatrics suggests letting small children draw faces with markers and leaving the carving to adults. Children can scoop, draw and choose the design.
- Use battery lights instead of candles. The National Fire Protection Association recommends flashlights or battery-operated candles in jack-o’-lanterns.
- Keep lit pumpkins away from paths, doorways and costumes.
For more ways to keep the night safe, see our Halloween safety checklist for parents.
How to make a carved pumpkin last longer
A carved pumpkin is fresh produce, so it will soften over time. You can slow that down:
- Carve close to Halloween. A day or two before you plan to light it gives the best result.
- Wash and dry it first. Wiping the outside with warm water and drying it removes dirt before you carve.
- Seal the cut edges. University of Illinois Extension suggests coating the inside and cut edges with petroleum jelly to reduce drying out.
- Keep it cool and shaded. Heat and direct sun make pumpkins soften faster.
- Use LED lights. The heat from a candle cooks the flesh and shortens a pumpkin’s life.
How long a carved pumpkin lasts depends heavily on the weather. Uncarved pumpkins usually last much longer; with good care, extension experts say they can last into Thanksgiving. Consider leaving some whole for your display.
Creative ways to display your pumpkins
- Stagger them on porch steps, with the largest at the bottom and minis near the top.
- Group in odd numbers. Three or five pumpkins of different sizes look balanced.
- Mix carved and uncarved pumpkins, including white and green varieties.
- Light from inside with LEDs. Warm white looks traditional; colored LEDs suit cute and modern designs.
- Add natural fall decor, such as straw bales, dried corn, gourds and fall leaves, kept well away from any open flame.
- Use the shadows. Patterned designs like stars, leaves and bats project shapes onto nearby walls.
Curious where the tradition started? Our guide to why we celebrate Halloween explains the history of the jack-o’-lantern.
FAQ
What is the easiest pumpkin to carve for beginners?
A medium-size, smooth, round pumpkin with a flat bottom and a sturdy stem. Its walls are easier to cut evenly, and it gives you plenty of space for a simple design.
How long does it take to carve a simple pumpkin?
Most simple designs take 20 to 45 minutes, including scooping. Shaded or layered designs can take an hour or more.
What tools are best for easy pumpkin carving?
A basic pumpkin carving kit with small serrated saws, a scoop and a poking tool, plus a washable marker. These tools are designed for pumpkin skin and are easier to control than kitchen knives.
How can I make a pumpkin design look neat?
Draw it first with a washable marker, thin the carving wall to about 1 inch, cut the smallest shapes first and push the pieces out from inside. Wipe off marker lines when you’re done.
How can I keep a carved pumpkin fresh longer?
Carve it a day or two before Halloween, coat the cut edges with petroleum jelly, keep it in a cool, shaded place and use LED lights instead of candles.
The bottom line
The best easy pumpkin carving ideas rely on bold, simple shapes and a little preparation. Choose a firm pumpkin, scoop the wall thin, draw before you cut and let adults handle the sharp tools. Start with a classic face or a set of stars, then try the layered design when you’re ready for more.
Sources
- University of Illinois Extension: How to pick the perfect pumpkin
- American Academy of Pediatrics: Halloween Safety Tips
- National Fire Protection Association (via Connecticut Commission on Fire Prevention and Control): Halloween Fire Safety Tips
- Kane County Connects: University of Illinois Extension advice on picking, carving and keeping pumpkins
Comments